 Save to Pinterest
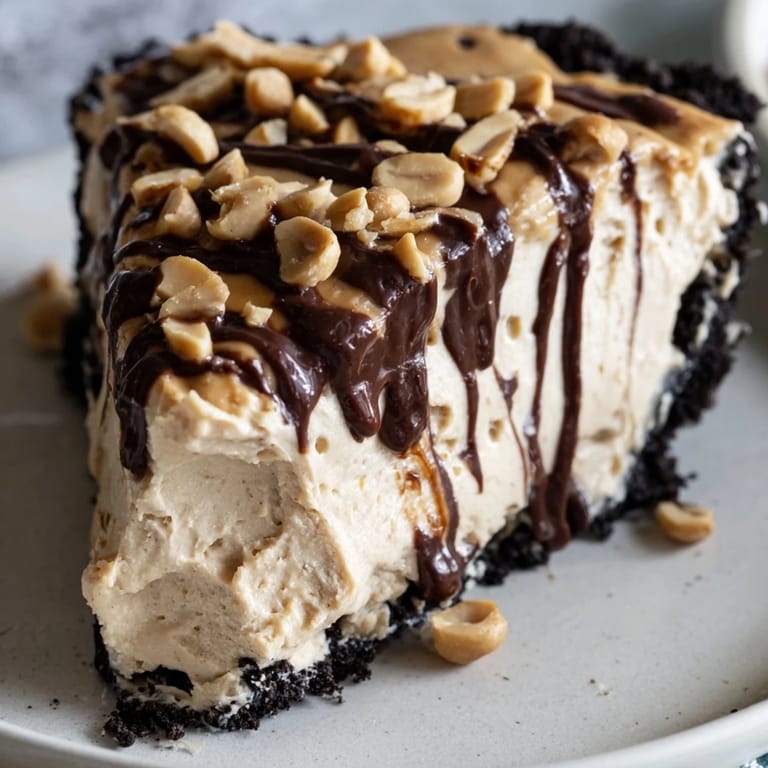
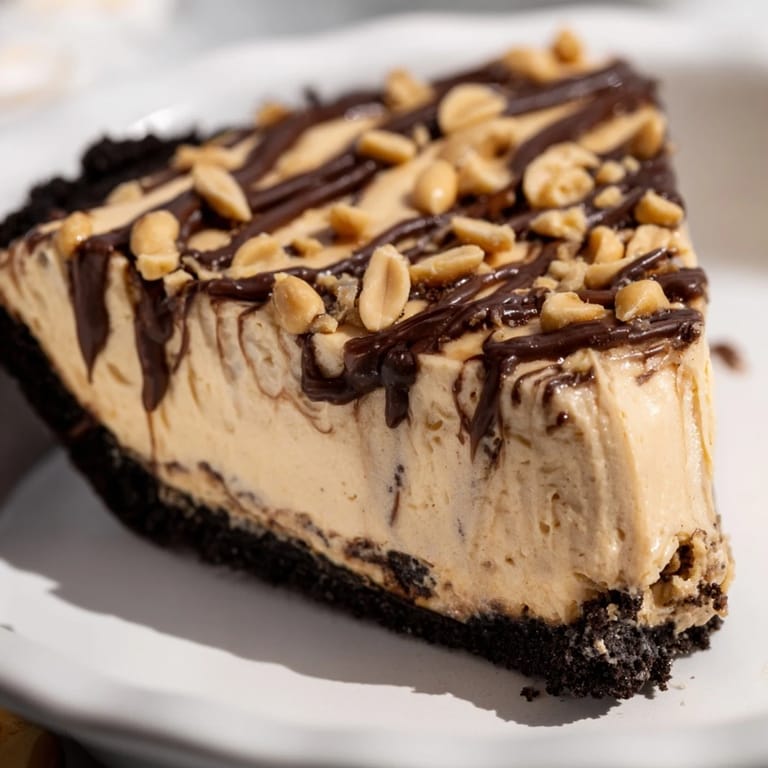
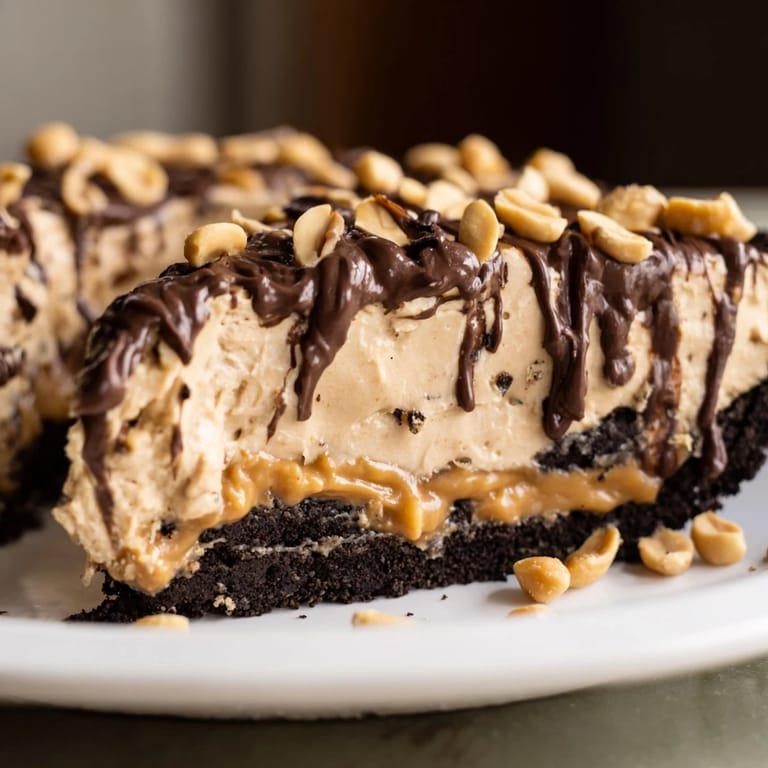
 My friend Sarah showed up at my door one summer afternoon with a craving she couldn't shake—peanut butter everything. We had a block of cream cheese softening on the counter and a jar of peanut butter staring us down, so we decided right then to skip the oven entirely and make something that would be ready by dinner. That first slice revealed why no-bake desserts exist: pure, unapologetic decadence without the heat or fuss. The chocolate cookie crust shattered under my fork, and the filling was impossibly creamy, like eating sweetened clouds that somehow tasted like your favorite childhood sandwich.
I made this for a potluck last fall where everyone else brought their usual suspects, and I watched grown adults go quiet the moment they tasted it. One woman asked for the recipe three times before leaving, and I realized then that simple, honest desserts sometimes speak louder than anything complicated.
Ingredients
- Chocolate sandwich cookies: Crush them finely so the crust holds together instead of remaining crumbly—the dust matters here.
- Unsalted butter, melted: This is your glue; it's what turns cookie crumbs into an actual crust you can slice through cleanly.
- Creamy peanut butter: Don't use natural or freshly ground; the regular stuff has just enough stability to carry the filling without weeping oil.
- Cream cheese, softened: Take it out of the fridge 30 minutes before; cold cream cheese will fight you when you beat it.
- Powdered sugar: Sift it first or your filling will have little grains that catch between your teeth.
- Heavy cream, cold: The colder it is, the faster it whips to stiff peaks and stays there.
- Vanilla extract: A small touch that lifts the whole thing without announcing itself.
- Salt: Even a pinch transforms the peanut butter from one-note to complex.
- Chocolate chips and garnish: These finish the pie, but they're optional—the filling stands alone.
Tired of Takeout? 🥡
Get 10 meals you can make faster than delivery arrives. Seriously.
One email. No spam. Unsubscribe anytime.
Instructions
- Make the crust:
- Mix your crushed cookies with melted butter until everything looks like wet sand, then press it into your pie dish with even pressure across the bottom and sides. The crust will firm up as it chills, so don't worry if it feels fragile—it won't be.
- Start the filling:
- Beat the peanut butter, softened cream cheese, powdered sugar, vanilla, and salt together until the mixture is pale and fluffy, about 2 minutes. Don't skip the beating; it aerates everything and keeps the filling light.
- Whip the cream:
- In a separate bowl with clean beaters, whip your cold heavy cream until it forms stiff peaks that hold their shape. This is your secret to a mousse-like texture instead of dense heaviness.
- Fold it together:
- Gently fold the whipped cream into the peanut butter mixture in two additions, using a rubber spatula and being patient—each fold should take just a few turns. Overworking this step deflates all that lovely air you just created.
- Spread and chill:
- Pour the filling onto your chilled crust and smooth the top with a spatula, then cover and refrigerate for at least 4 hours. Overnight is even better if you can wait.
- Optional chocolate finish:
- Heat your heavy cream until it barely simmers, pour it over chocolate chips, wait a minute for them to soften, then stir until glossy. Drizzle this ganache over the chilled pie, and if you want extra flair, scatter roasted peanuts or shaved chocolate on top.
 Save to Pinterest
 The moment when someone cuts into this pie and that first slice holds its shape perfectly—clean edges, no slump—that's when you know you did it right. It's a small victory, but it feels like you've pulled off something fancy when really you just let refrigeration do the work.
Storage and Make-Ahead Magic
This pie is happiest when made a day or two ahead; the flavors meld and the texture becomes even more silky. Cover it loosely with plastic wrap once it's fully chilled, and it will keep for up to 4 days in the refrigerator without losing its charm. You can even assemble it the morning of a gathering and add the chocolate topping just before serving if you want everything to feel fresh.
Variations That Actually Work
While this recipe is perfect as written, it also happens to be a canvas if you want to play around. A drizzle of caramel sauce into the filling brings an unexpected sweetness, or you could swap in chocolate peanut butter cookies for an even richer crust. Some people swear by adding a tablespoon of honey to the filling for extra depth, and I've seen it done successfully.
Serving Suggestions and Final Thoughts
Slice this pie while it's cold straight from the fridge—a hot knife dipped in water between cuts keeps everything clean and the slices looking presentable. Serve it alongside strong coffee or a tall glass of cold milk, and watch people's faces light up as they realize something this good doesn't need an oven to happen.
- If you're serving a crowd, slice it 15 minutes after removing from the fridge so it's still cold but just barely easier to cut.
- Leftover slices work fine at room temperature for an hour or two, but they're honestly best served cold.
- This freezes beautifully for up to a month if you want to make it even further ahead.
 Save to Pinterest
 This pie has become my go-to when I want to show up somewhere with something impressive but refuse to spend hours baking. It's honest food, unmistakably delicious, and it never fails to make people smile.
Frequently Asked Recipe Questions
- → How is the crust made?
The crust is made by mixing finely crushed chocolate sandwich cookies with melted butter, then pressed firmly into a pie dish and chilled.
- → What gives the filling its creamy texture?
The creamy filling combines peanut butter, softened cream cheese, powdered sugar, and whipped heavy cream for a smooth and airy consistency.
- → Can I make this dessert gluten-free?
Yes, using certified gluten-free chocolate cookies creates a delicious gluten-free base without compromising flavor.
- → What is the optional topping?
An optional chocolate ganache is made by heating heavy cream and pouring it over chocolate chips, then drizzled over the chilled filling with roasted peanuts or chocolate shavings.
- → How long should it chill before serving?
Chill the dessert for at least 4 hours to allow the filling to set and the flavors to develop fully.